

Pour Over Coffee Without Special Equipment
Table of Contents
- What You'll Need: Household Substitutes for a Dripper
- Pour Over Coffee Ratio: Getting the Measurements Right
- Coffee Grind Size for Pour Over Success
- How to Bloom Coffee Before Brewing
- Step-by-Step Brewing Process
- Troubleshooting Common Extraction Issues
- Cleaning, Maintenance, and Sustainability
- Conclusion
- Frequently Asked Questions
Last Updated: September 21, 2026
What You'll Need: Household Substitutes for a Dripper
You don't need expensive equipment to brew excellent pour over coffee. Most kitchens already have what you need, though not all household materials are safe for filtering hot water.
Safe filter materials:
A mesh strainer, fine-mesh sieve, cheesecloth, or clean coffee filter all work. The key is finding something that holds grounds while letting water flow through without leaching chemicals.
Here are common household items that work:
- Mesh strainer (stainless steel or nylon), Most durable and safest option.
- Fine-mesh sieve or tea infuser, Usually stainless steel or food-grade nylon.
- Cheesecloth layered 2-3 times, Food-grade only; avoid craft cheesecloth.
- Unbleached coffee filter, Safe and designed for this purpose.
- Old cloth napkin or thin kitchen towel, Only if 100% cotton or linen with no synthetic blends or chemical treatments.
- Paper towels (use with caution), Rinse thoroughly with hot water first to remove bleach residue.
Materials to avoid:
Avoid bleached paper towels without rinsing, cloth treated with fabric softener or starch, and synthetic fabrics like polyester or microfiber.
Filter preparation, critical for safety and taste:
Rinse cloth or paper filters with hot water before use to remove fibers, dust, and chemical residue. For cheesecloth, soak in hot water for 1-2 minutes. For cloth napkins, wash in hot water without detergent and rinse until clear. Metal strainers need only be clean and rust-free.
Use any heat-safe vessel, a mug, glass jar, or measuring cup. Avoid plastic unless labeled heat-safe to at least 212°F.
Pour Over Coffee Ratio: Getting the Measurements Right
The standard pour over coffee ratio is 1 part coffee to 16 parts water by weight. This means 1 gram of coffee to 16 grams of water.
Without a scale, use one tablespoon of grounds per six ounces of water. For an 8-ounce mug, use 1-2 tablespoons depending on strength preference.
| Brew Size | Coffee Grounds | Water |
|---|---|---|
| 1 cup (8 oz) | 1-2 tablespoons | 8 oz |
| 2 cups (16 oz) | 2-3 tablespoons | 16 oz |
| 4 cups (32 oz) | 4-6 tablespoons | 32 oz |
Start with the middle measurement and adjust by taste. The 1:16 ratio controls extraction: too much water tastes thin, too little tastes harsh.
Coffee Grind Size for Pour Over Success
Grind size controls how fast water flows through your grounds. This directly affects taste and is the single most common reason DIY pour-overs fail.
For pour over coffee, use a coarse grind. Think sea salt or breadcrumbs, not powder. Coarse grounds let water flow at the right speed, extracting flavor without bitterness.
Why grind size matters:
- Fine grounds pack tight and slow water flow (over-extraction, bitter taste)
- Medium grounds work but are harder to control without equipment
- Coarse grounds create space for water to flow evenly
- Uneven flow leaves some grounds under-extracted and others over-extracted
Coarse grind looks like breadcrumbs or sea salt crystals, individual particles visible and separate. If grounds look like flour, they're too fine. If they look like pebbles, they're too coarse. Place a small amount on a plate; you should see individual particles clearly.
If you don't have a grinder:
Ask your local coffee shop to grind beans for you. Tell them "coarse grind for pour over." Most shops do this free or for a small fee. This is worth the trip, hand-crushing beans rarely produces consistent results.
If you must crush beans by hand, place them in a sealed bag and crush with a rolling pin or heavy object. Aim for pieces roughly the size of a pea. Expect inconsistency; some pieces will be finer than others. This uneven grind will produce uneven extraction, but it's better than nothing.
How grind size affects brew time:
Coarse grounds brew faster (2-3 minutes total). Fine grounds brew slower (4-5 minutes). If your brew finishes in under 2 minutes, your grind is too coarse or you're pouring too fast. If it takes longer than 5 minutes, your grind is too fine or your grounds are packed too tight.
Common grind-size mistakes:
- Using pre-ground coffee labeled "drip" or "all-purpose." These are usually medium-fine, not coarse, and will over-extract in a pour-over setup.
- Grinding too fine because you think finer = stronger. This produces bitter, harsh coffee, not stronger coffee.
- Assuming all coarse grinds are the same. Coarse from a burr grinder is more uniform than hand-crushed coarse, and produces better results.
The grind size affects how long brewing takes. It also determines whether water flows evenly through all grounds or channels through weak spots, leaving some grounds dry. Consistency in grind size matters as much as the size itself.
How to Bloom Coffee Before Brewing
Blooming is the first step of pour over coffee brewing. It's simple but important.
Single Origin Favorites Sample Pack →
Blooming means pouring just enough hot water to saturate the grounds. Let them sit for 30-45 seconds. This releases trapped gases and preps the grounds for full extraction.
Here's why it matters: coffee grounds release carbon dioxide when they first contact hot water. This gas creates a barrier. If you pour all your water at once, the gas escapes unevenly, and your extraction becomes inconsistent. Blooming releases the gas first, so the rest of your water can extract flavor evenly.
How to bloom without special equipment:
- Place grounds in your makeshift dripper
- Pour just enough hot water to wet all grounds (roughly twice the weight of grounds)
- Wait 30-45 seconds
- Watch for bubbling, that's the gas escaping
- Pour the rest of your water slowly
This small pause makes a measurable difference. Bloomed coffee tastes smoother and more balanced. It's the difference between good coffee and great coffee, and it costs nothing.
Step-by-Step Brewing Process
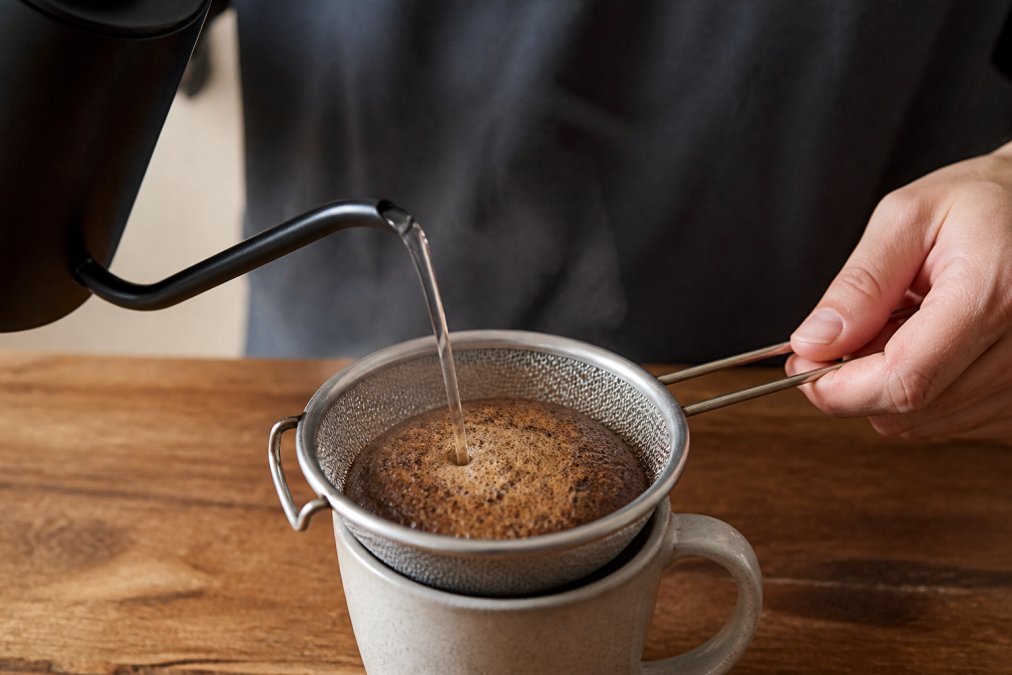
Brewing pour over coffee follows a simple sequence. The whole process takes 3-4 minutes.
Step 1: Heat your water (3-4 minutes) Boil water in a kettle or pot. Let it cool for 30 seconds after boiling. You want water around 195-205°F. If you don't have a thermometer, just wait half a minute after boiling.
Step 2: Prepare your dripper (1 minute) Place your mesh strainer or cloth over your mug or carafe. Make sure it sits stable and won't tip. If using cloth, secure it with a rubber band or clothespin.
Step 3: Add grounds (1 minute) Pour your measured grounds into the dripper. Tap gently to level them. Don't pack them down, let them settle naturally.
Step 4: Bloom (45 seconds) Pour hot water slowly until grounds are just wet. Watch for bubbling. Wait 30-45 seconds.
Step 5: Pour the rest (2 minutes) Pour the remaining water in slow, steady circles. Pour from the center outward, then back to center. Keep the water level consistent. This takes about 2 minutes total.
Step 6: Wait for draw-down (30 seconds) Stop pouring when water level drops to the grounds.
Troubleshooting Common Extraction Issues
Extraction problems show up as taste issues. Here's how to fix them.
Problem: Coffee tastes bitter or harsh
- Using coarser grounds
- Pouring faster
- Using less coffee
- Reducing brew time
Problem: Coffee tastes weak or thin
- Using finer grounds (but not too fine)
- Pouring slower
- Using more coffee
- Increasing brew time
Problem: Water flows through too fast
- Slightly finer grounds
- Tapping grounds gently to settle them
- Pouring more slowly at the start
Problem: Water doesn't flow through at all
- Coarser grounds
- Pouring more gently
- Using less coffee
Problem: Coffee tastes inconsistent
Your pouring technique needs work. Focus on:
- Pouring at a steady, even pace
- Keeping water level consistent
- Pouring in circles rather than straight down
- Waiting the full bloom time
Cleaning, Maintenance, and Sustainability
Clean your dripper immediately after brewing. Dried coffee residue hardens and affects future brews.
Conclusion
Making excellent pour over coffee doesn't require special equipment or expensive gear. A mesh strainer, hot water, and the right technique are all you need. The key is understanding extraction: how water temperature, grind size, and brew time work together to pull flavor from grounds.
Frequently Asked Questions
Can you make pour-over coffee with a regular coffee filter?
Yes. A standard coffee filter works perfectly for pour over brewing. Place it in any vessel with a spout or opening, add your grounds, and pour water slowly. Paper filters trap sediment and oils, producing a clean cup. If you don't have filters, cheesecloth, a fine mesh strainer, or even a clean cloth napkin can substitute, though they may allow more sediment through.
What's the best pour over coffee ratio for consistent results?
Use a 1:16 ratio of coffee to water by weight. For example, 25 grams of coffee to 400 grams of water produces about 12 ounces of brewed coffee. If measuring by volume, use 1 tablespoon of grounds per 6 ounces of water. Adjust slightly based on your taste preference: less coffee for a lighter cup, more for strength. Consistency matters more than perfection.
How do I know what coffee grind size for pour over is correct?
Pour over coffee requires a coarse grind, similar to sea salt or breadcrumbs. It should be noticeably coarser than espresso but finer than French press grounds. If your coffee tastes bitter or over-extracted, your grind is too fine. If it tastes weak or under-extracted, it's too coarse. Grind fresh beans just before brewing for maximum flavor and aroma.
Why is blooming coffee important, and how do I do it?
Blooming releases trapped gases and prepares grounds for even extraction, improving flavor and reducing bitterness. To bloom, pour just enough hot water (200-205°F) to saturate the grounds, then wait 30-45 seconds before continuing to pour. You'll see the grounds bubble and expand. This step is essential for fresh, quality beans and takes minimal time but significantly improves your cup.