

How to Brew Pour Over Coffee: A 2026 Guide
Table of Contents
- What You Need to Brew Pour Over Coffee
- Best Coffee to Water Ratio for Pour Over
- Pour Over Coffee Grind Size Guide
- How to Bloom Coffee (And Why It Matters)
- Step-by-Step: How to Brew Pour Over Coffee
- Troubleshooting Bitter or Sour Pour Over Coffee
- Equipment Maintenance, Water Quality, and Sustainability
- Conclusion
Last Updated: August 16, 2026
Pour over coffee rewards precision. The technique is simple enough to master at home, but variables like grind size, water temperature, and pour timing interact in ways that can transform a cup from flat to remarkable. This guide from Cenia's Coffee walks through every step of how to brew pour over coffee, from essential gear to taste-based troubleshooting that most tutorials skip.
The biggest mistake beginners make: treating pour over as set-it-and-forget-it. Every variable you control directly shapes what ends up in the cup. Below, we'll cover how to manage those variables, plus water chemistry and equipment maintenance, quiet factors that determine whether your brew is consistently excellent or just occasionally good.
What You Need to Brew Pour Over Coffee
Essential Equipment
Pour over brewing requires a focused set of tools, none exotic or expensive.
- Pour-over dripper: Ceramic, glass, and plastic all work; ceramic retains heat best, which matters for longer brews.
- Gooseneck kettle: Non-negotiable. A gooseneck spout gives precise control over flow rate and pour placement.
- Digital scale with tare function: Measuring by volume introduces too much variation. Weighing in grams is the only way to hit a consistent water-to-coffee ratio.
- Burr grinder: Blade grinders produce uneven particle sizes, leading to uneven extraction. Even an entry-level burr grinder is a meaningful upgrade.
- Filter papers: Match the filter to your dripper. Some prefer unbleached; others rinse bleached filters first.
- Timer: Brew time is a key diagnostic tool for troubleshooting.
- Mug or carafe: To catch the brew.
Choosing the Right Coffee Beans
Grind size, water temperature, and technique can only do so much. The beans themselves set the ceiling on what's possible.
Pour over is a particularly revealing method, it highlights a bean's clarity and complexity rather than masking it. Single-origin beans tend to shine here, especially light to medium roasts where distinct tasting notes come through cleanly. Freshness matters more with pour over than almost any other method. Beans roasted to order, like those from Cenia's Coffee, give you a meaningful advantage: CO2 is still present in freshly roasted beans, driving the bloom. Beans sitting on shelves for months have off-gassed already, producing a weak bloom and flat extraction.
Best Coffee to Water Ratio for Pour Over
The best coffee to water ratio for pour over is 1:15 to 1:17 by weight, meaning 1 gram of coffee for every 15 to 17 grams of water. A 1:15 ratio produces a fuller-bodied, more intense cup; 1:17 yields something lighter and brighter.
A practical starting point is 25 grams of coffee to 400 milliliters of water, sitting comfortably in the middle of the recommended range and producing a balanced, medium-strength brew. Adjust based on taste: if too strong, add water or reduce coffee; if weak, tighten the ratio.
| Ratio | Coffee (g) | Water (ml) | Result |
|---|---|---|---|
| 1:15 | 25 | 375 | Full-bodied, intense |
| 1:16 | 25 | 400 | Balanced, versatile |
| 1:17 | 25 | 425 | Light, bright, delicate |
Measure both coffee and water on a digital scale. Volumetric measurements vary depending on grind size and bean density, making consistency impossible.
Pour Over Coffee Grind Size Guide
Grind size is the most powerful variable in pour over brewing. The correct grind is medium-fine, finer than drip coffee, coarser than espresso, like coarse table salt or slightly coarser sand.
Grind size controls how quickly water passes through the coffee bed and how much surface area is available for extraction. Finer grinds slow flow rate and increase contact time, risking over-extraction. Coarser grinds speed up draw-down and reduce contact time, risking under-extraction.
Start at medium-fine and adjust based on brew time. If total draw-down takes longer than four minutes, grind coarser. If it finishes in under two minutes, go finer.
How to Bloom Coffee (And Why It Matters)
Blooming pre-wets coffee grounds with a small amount of hot water before the main pour, triggering the release of CO2 trapped inside freshly roasted beans. That CO2, if not released before brewing, creates gas pockets that disrupt even water flow and produce inconsistent extraction.
To bloom, pour roughly twice the weight of the coffee in water, for 25 grams of coffee, use 50 milliliters of water. Pour slowly and evenly over all the grounds, then wait 30 to 45 seconds. You'll see the grounds swell and bubble as CO2 escapes. Beans roasted recently will bloom vigorously; older beans will barely react, signaling a freshness issue.
A strong bloom improves extraction consistency by ensuring the grounds are ready to receive water evenly.
Step-by-Step: How to Brew Pour Over Coffee
This process assumes 25 grams of coffee and 400 milliliters of water, with a target total brew time of 3 to 4 minutes.
What You'll Need: Pour-over dripper, gooseneck kettle, digital scale, burr grinder, filter paper, timer, mug or carafe.
- Heat your water. Target 195-205°F (90-96°C). If you don't have a thermometer, bring water to a boil and let it rest for 30 to 45 seconds.
- Grind your coffee. Set your burr grinder to medium-fine. Grind 25 grams immediately before brewing.
- Prepare the filter. Place the filter paper in the dripper, set it over your mug or carafe, and rinse with hot water. Discard the rinse water.
- Add coffee grounds. Pour the ground coffee into the filter. Tare your scale to zero.
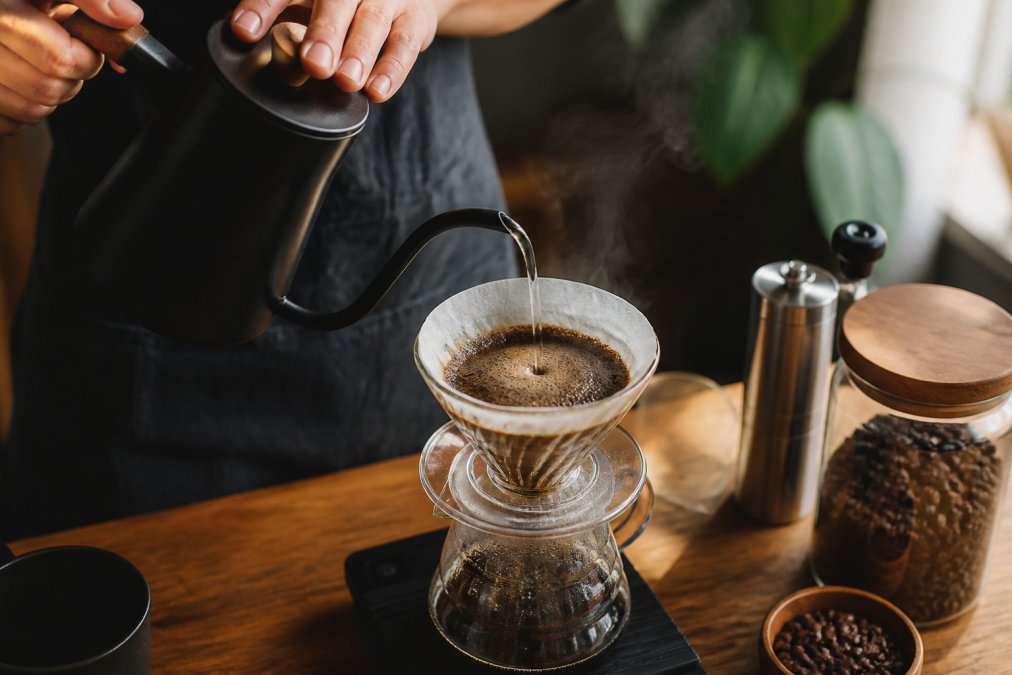
- Start the bloom. Pour 50 milliliters of water over the grounds in a slow, circular motion, starting from the center and spiraling outward. Start your timer. Wait 30-45 seconds.
- Begin the main pour. Pour water slowly in a steady spiral, keeping the gooseneck close to the coffee bed. Aim to reach 200 milliliters by the 1:00 mark.
- Continue pouring in stages. Add another 100 milliliters between 1:00 and 2:00, then the final 100 milliliters between 2:00 and 3:00. Keep the water level consistent.
- Allow full draw-down. The water should finish draining by 3:30 to 4:00. If it finishes significantly faster or slower, adjust your grind next time.
- Remove the dripper and serve immediately.
Water Temperature and Pouring Technique
Water temperature directly affects extraction rate. According to the Specialty Coffee Association's brewing standards, the recommended brewing temperature range for filter coffee is 195-205°F. Below 195°F, extraction slows and the cup turns sour. Above 205°F, extraction accelerates and bitterness increases.
Pouring technique shapes how evenly water contacts the coffee bed. A slow, circular pour, starting at the center and moving outward, keeps the slurry stable and prevents channeling, where water finds a path of least resistance through the grounds rather than flowing evenly. Avoid pouring directly onto the filter paper.
Draw-Down Time and What to Watch For
Draw-down time is the total time from first pour to when the last drop passes through the filter. For most pour over setups, the target window is 3:00 to 4:00 minutes.
If draw-down finishes in under 2:30, the grind is too coarse or the ratio is too dilute. If it takes longer than 4:30, the grind is too fine, the filter is clogged, or the grounds were packed unevenly. Watch the coffee bed as it drains: it should draw down relatively evenly across the surface.
Troubleshooting Bitter or Sour Pour Over Coffee
Most pour over problems trace back to two root causes: over-extraction produces bitterness; under-extraction produces sourness.
The cup tastes bitter:
- Grind is too fine → coarsen by one or two steps
- Water temperature is too high → let boiled water rest longer
- Brew time is too long → coarsen grind or pour faster
- Coffee-to-water ratio is too concentrated → increase water or reduce coffee
The cup tastes sour or sharp:
- Grind is too coarse → tighten by one or two steps
- Water temperature is too low → brew hotter
- Brew time is too short → fine the grind or slow your pour
- Bloom was skipped or too short → extend bloom to 45 seconds
The cup tastes flat or papery:
- Filter wasn't rinsed → always pre-wet with hot water
- Beans are stale → freshly roasted beans make a significant difference
- Grind was done in advance → grind immediately before brewing
The cup tastes inconsistent from brew to brew:
- Measuring by volume instead of weight → switch to a digital scale
- Pouring speed varies → practice a steady, controlled pour
- Grind setting shifting → check burr grinder calibration
Equipment Maintenance, Water Quality, and Sustainability
Equipment Maintenance
Clean equipment matters more than most people expect. Coffee oils coat the dripper, filter holder, and kettle over time and go rancid, contributing off-flavors to every subsequent brew.
Rinse your dripper with hot water after every use. Once a week, wash it with a small amount of dish soap and rinse thoroughly. Gooseneck kettles should be descaled every one to three months depending on water hardness. For burr grinders, brush out the grounds chamber after every session and do a deeper clean with a grinder brush every few weeks.
Water Quality
Water quality has a measurable effect on extraction. According to the SCAA water quality standards for brewing, ideal brewing water should be free of odors, have a neutral pH around 7, and contain moderate mineral content, roughly 150 parts per million total dissolved solids.
Distilled water produces flat, underdeveloped coffee because minerals play an active role in extraction chemistry. Hard tap water can introduce off-flavors and scale buildup. Filtered tap water from a standard carbon filter is often the best practical option for most home setups.
Sustainability
Pour over produces relatively little waste compared to capsule systems. Used coffee grounds are excellent compost material and can be added directly to a garden or compost bin. Reusable metal or cloth filters eliminate paper waste entirely, though they allow more oils through, producing a heavier-bodied brew.
Conclusion
Mastering how to brew pour over coffee comes down to controlling a small set of variables consistently: ratio, grind size, water temperature, and pour technique. The challenge isn't complexity, it's building the habit of measuring, timing, and tasting systematically until the process becomes second nature.
Starting with great beans makes every other variable easier to manage. Cenia's Coffee roasts to order, sourcing carefully from trusted farms, so the beans that arrive at your door are fresh enough to bloom properly and expressive enough to reward the precision that pour over demands. Browse the current selection and find a roast profile built for your brewing method.
Frequently Asked Questions
What is the ideal coffee-to-water ratio for pour over?
The standard starting point is 1:15 to 1:17, roughly 15 to 17 grams of water for every 1 gram of coffee. A 20-gram dose with 300 milliliters of water (1:15) produces a fuller, more concentrated cup. Scaling to 1:17 gives a lighter, brighter result. Use a digital scale to measure by weight rather than volume for consistent results every time you brew pour over coffee.
How does grind size affect the flavor of pour over coffee?
Grind size controls how quickly water moves through the coffee bed and how much it extracts. A medium-fine grind, similar to coarse table salt, is the standard for most pour-over drippers. Grind too fine and water slows down, over-extracting and producing bitterness. Grind too coarse and water rushes through, under-extracting and leaving the cup sour or weak. Adjusting grind size is the fastest way to fix flavor problems without changing your recipe.
Do I need a gooseneck kettle to make good pour over coffee?
A gooseneck kettle is not strictly required, but it makes a real difference. Its narrow spout gives you precise control over pour rate and direction, which directly affects agitation and even saturation of the coffee bed. A standard kettle can work, but you risk pouring too fast or unevenly, which causes channeling and inconsistent extraction. If you brew pour over coffee regularly, a gooseneck kettle is one of the most worthwhile tools to add.
Can you use regular pre-ground coffee for a pour over?
Yes, pre-ground coffee works in a pour-over dripper, but the results are harder to control. Pre-ground coffee is often set to a medium grind meant for drip machines, which may be slightly too coarse for optimal pour-over extraction. Freshly ground beans give you control over grind size and produce better flavor because coffee starts losing volatile aromatics within minutes of grinding. For the best cup, grind fresh immediately before brewing.
Is pour over really better than drip coffee?
Pour over gives you hands-on control over every variable, water temperature, pour rate, contact time, and agitation, that an automatic drip machine handles for you automatically. That control means you can dial in a cleaner, brighter, more nuanced cup, especially with single-origin beans that have distinct tasting notes. Drip machines are faster and more consistent with less effort. Which is better depends entirely on whether you want precision or convenience.
What are the most common mistakes when brewing pour over coffee?
The most common mistakes are skipping the bloom, using water that is too hot or too cool, pouring too fast, and ignoring grind size. Skipping the bloom traps CO2 in the grounds and blocks even extraction. Water above 205°F scorches light roasts; water below 195°F under-extracts most beans. Pouring too fast causes channeling. Always weigh your coffee and water with a digital scale rather than estimating by volume, small measurement errors compound into noticeably different cups.
This article was written using GrandRanker