

How to Adjust Grind Size for Espresso Machines
Table of Contents
- Understanding Grind Size Basics for Espresso
- How to Dial In Espresso: The Core Process
- Espresso Shot Timing and Extraction Time
- Signs of Under-Extraction vs. Over-Extraction
- Espresso Extraction Troubleshooting Guide
- Adjusting Grind Size for Different Bean Types
- Environmental Factors: Temperature and Humidity
- Frequently Asked Questions
Last Updated: September 25, 2026
Understanding Grind Size Basics for Espresso
Understanding how to adjust grind size for espresso machines is the foundation of espresso extraction. Get this wrong, and no amount of tamping or pressure will save your shot. Get it right, and even a modest espresso machine produces excellent results.
Grind size refers to how fine or coarse your coffee particles are after grinding. Think of it on a spectrum. At one end, you have powder-fine particles. At the other, you have granules closer to sand. Espresso demands precision, your grind needs to be consistent and fall within a narrow range.
Why does this matter so much? Water flows through coffee grounds based on particle size and how tightly they pack together. Finer grounds slow water down. Coarser grounds let water rush through. With espresso, you're forcing hot water through grounds under pressure. The grind size controls how long that water stays in contact with the coffee, and contact time determines extraction.
Most home espresso users start by guessing. They grind, pull a shot, and hope. When the shot runs too fast or too slow, they adjust blindly. The result is inconsistent, mediocre espresso. The fix is understanding what you're actually controlling.
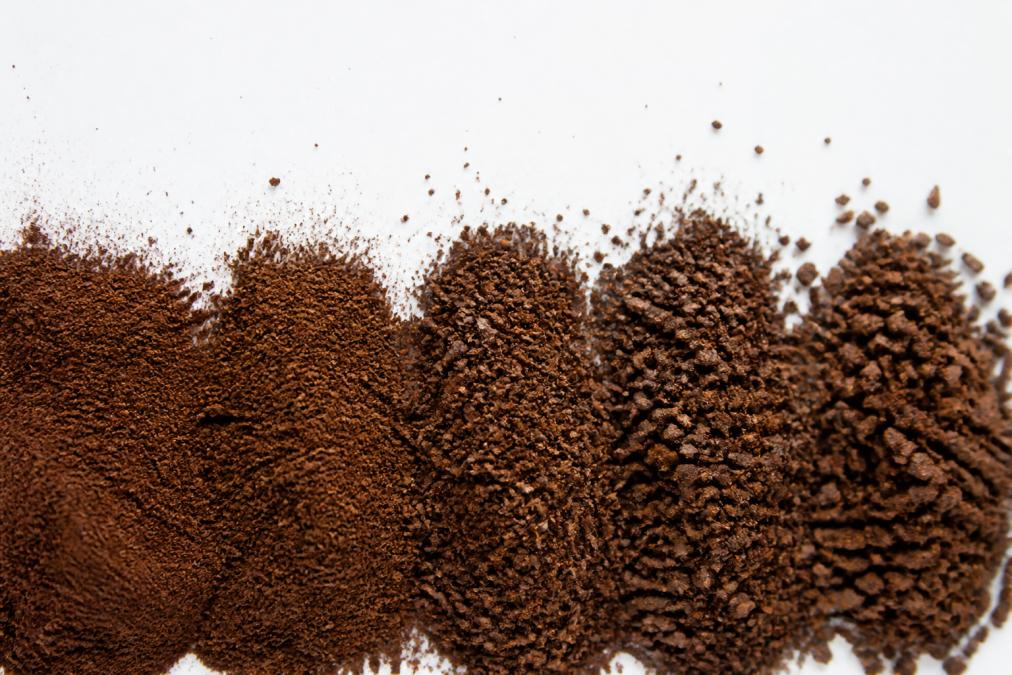
Your grinder has a dial or lever. Turning it adjusts burr spacing. Smaller spacing = finer grind. Larger spacing = coarser grind. Most grinders offer dozens of settings between these extremes. A quality burr grinder (flat or conical burrs) produces consistent particle size. A blade grinder produces chaos, particles of wildly different sizes. If you're serious about espresso, a burr grinder is non-negotiable.
Consistency matters more than perfection. A grind that's uniform at medium-fine will outperform a grind that's wildly inconsistent. This is where grinder quality shows itself. Cheap grinders produce many particle sizes. Good grinders cluster particles tightly around your target size.
How to Dial In Espresso: The Core Process
Dialing in means adjusting your grind size until your espresso extracts properly. This is the core skill separating mediocre home espresso from good espresso.
A proper espresso shot takes 25-30 seconds from water contact to finish. This is your target window. If your shot finishes in 15 seconds, water rushed through, under-extraction. If it takes 45 seconds, water moved too slowly, over-extraction. The grind size controls this timing.
Start with a baseline grind setting. Most grinders have a suggested starting point for espresso. Use that. Pull your first shot and time it. Write down the seconds. Then taste it. Does it taste sour or thin? That's under-extraction, go finer. Does it taste bitter or ashy? That's over-extraction, go coarser.
Adjust one setting at a time. If your shot ran 18 seconds, don't jump three full dial positions. Move one or two clicks toward finer. Grind fresh, tamp, and pull again. Repeat until you hit that 25-30 second window.
Step-by-Step Adjustment Process
-
Pull your baseline shot. Use your current grind setting. Time it from water contact to the last drops falling into your cup. Record the time.
-
Assess the taste. Sour or thin = under-extracted. Bitter or harsh = over-extracted. Balanced sweetness = you're close.
-
Make one micro-adjustment. Turn your grinder dial one or two clicks. One click typically changes shot time by 2-4 seconds. Finer = slower shots. Coarser = faster shots.
-
Purge the grinder. Run the grinder for a few seconds without a basket to clear old grounds. This prevents old, finer particles from mixing with new grounds.
-
Grind fresh coffee. Use your new setting. Grind directly into your basket.
-
Tamp with consistent pressure. Use the same pressure every time, roughly 30 pounds of force. Inconsistent tamping ruins your dial-in work.
-
Pull the shot. Time it. Note the seconds.
-
Repeat until you hit 25-30 seconds. Each adjustment should move you closer. Most dial-ins take 5-10 shots.
Micro-Adjustments for Fine-Tuning
Once you're in the ballpark, micro-adjustments become critical. Your grinder's dial might have 40+ positions. Between position 15 and position 16 lies a meaningful difference in extraction time.
If your shot runs 27 seconds and tastes good, you're done. Stop adjusting. Resist the urge to "optimize" further, you'll just drift away from what works.
If your shot runs 24 seconds (slightly fast), move one click finer. If it runs 31 seconds (slightly slow), move one click coarser. One click often changes extraction time by 1-2 seconds. This is why micro-adjustments matter.
Keep a notebook. Write down your grinder setting, shot time, and tasting notes. Over time, you'll learn your specific grinder and machine. You'll recognize patterns. "Setting 18 gives me 27 seconds with this bean" becomes second nature.
Espresso Shot Timing and Extraction Time
Shot timing is your most objective measurement. A stopwatch doesn't lie. Your taste buds can be fooled by caffeine, habit, or a bad palate day. A timer never lies.
The 25-30 second window is the industry standard. This timing produces balanced extraction for most espresso blends. Some single-origin beans pull better at 23 seconds. Some at 32. But 25-30 is your starting target.
Why this window? Water needs time to dissolve soluble compounds from coffee. Too fast, and you miss the sweet, balanced flavors, you get only acids. Too slow, and you over-extract, you pull out bitter compounds that ruin the cup.
Think of extraction like steeping tea. Steep for 10 seconds and the water tastes weak. Steep for 10 minutes and it tastes bitter. Espresso is the same principle, just with pressure and heat added.
Your grind size controls flow rate. Flow rate controls shot time. Measure time, adjust grind, repeat. This feedback loop is how you dial in.
Signs of Under-Extraction vs. Over-Extraction
Under-extraction and over-extraction are the two main problems in home espresso. Learning to spot them saves you time and wasted coffee.
Taste Profile Indicators
Under-extracted espresso tastes:
- Sour or acidic
- Thin and watery
- Lacking sweetness or body
- Sharp on the palate
Over-extracted espresso tastes:
- Bitter or harsh
- Ashy or burnt
- Dry, leaving a harsh aftertaste
- Unpleasantly intense
The sour vs. bitter distinction is your primary diagnostic tool. Sour = go finer. Bitter = go coarser. Most beginners mistake sourness for weakness and add more coffee. Wrong move. Sourness means under-extraction. More coffee makes it worse.
Visual and Flow Rate Clues
Watch your shot pull. Under-extracted shots spray and splash. Water rushes through gaps in the puck. The stream is thin and fast. Espresso hits the cup in 12-18 seconds.
Over-extracted shots drip slowly. The flow slows to a trickle near the end. The stream becomes so thin you can barely see it. Espresso takes 40+ seconds to pour.
A proper shot flows in a steady, thick stream. It starts quickly and slows gradually. The flow rate is consistent, not sputtering, not gushing.
Espresso Extraction Troubleshooting Guide
Dial-in rarely goes perfectly. You'll hit snags. Here's how to diagnose and fix the most common problems.
Channeling and Uneven Flow
Channeling happens when water finds the path of least resistance through your coffee puck. Instead of flowing evenly through all the grounds, water carves channels. It rushes through these low-resistance paths while other areas stay dry.
The result: some grounds extract fully, others not at all.
How to fix channeling:
- Tamp harder and more evenly. Uneven tamping creates weak spots. Use 30 pounds of pressure. Press straight down, not at an angle.
- Distribute grounds evenly before tamping. Use a distribution tool or WDT (Weiss Distribution Technique), a needle or thin tool to break up clumps in the basket before tamping.
- Check your basket. A damaged basket or one with a loose screen allows water to bypass grounds. Replace if needed.
- Ensure your basket is level. Tilt your portafilter side to side. If the basket isn't level, tamping won't be even.
Grinder Retention and Purging
Retention is coffee left inside your grinder after grinding. Old grounds mix with fresh grounds. This ruins your dial-in because you're never grinding purely fresh coffee.
How to minimize retention:
- Purge before grinding. Run your grinder empty for 2-3 seconds. This clears out old, fine particles.
- Grind directly into your basket. Don't grind into a cup, then transfer. Each transfer leaves fines behind.
- Use a bellows or air blower. Some grinders have a small bellows to blow out retained grounds. Use it.
- Choose a low-retention grinder if buying new. Some designs are inherently better at this.
Adjusting Grind Size for Different Bean Types
Not all coffee beans dial in the same way. Single-origin beans, blends, light roasts, and dark roasts all behave differently.
Environmental Factors: Temperature and Humidity
Grind size doesn't exist in a vacuum. Temperature and humidity affect how your coffee behaves.
Frequently Asked Questions
What is the best grind size for an espresso machine?
Espresso requires a fine, consistent grind, typically between 0.75 and 1.5 millimeters in particle size. The exact setting depends on your specific machine, bean type, and desired extraction time (usually 25-30 seconds for a double shot). Start fine and adjust coarser if your shots pull too slowly or taste bitter. Consistency matters more than hitting one perfect size; uneven particles cause channeling and poor extraction.
How do I know if my espresso grind size is too fine?
If your grind is too fine, shots will pull slowly (over 35 seconds), produce excessive crema, and taste bitter or astringent. You may also notice water backing up in the portafilter or hear a hissing sound. The remedy is simple: adjust your grinder coarser by a few clicks and pull another test shot. Fine-tuning takes practice, but the feedback is immediate.
Why does my espresso taste sour or bitter based on grind size?
Sour shots indicate under-extraction (grind too coarse, water flowing too fast), while bitter shots signal over-extraction (grind too fine, water flowing too slowly). Sour espresso tastes sharp and acidic; bitter espresso tastes dry and burnt. Adjusting grind size is your primary lever: coarser for sour shots, finer for bitter ones. The dose, tamping pressure, and bean freshness also affect extraction, but grind size is where most dialing in happens.
Should I adjust my grinder while the motor is running?
No. Always stop your grinder before adjusting. Most grinder burrs are designed to be adjusted when stationary to ensure safe, precise changes. Adjusting under power risks damaging the burrs, causing uneven settings, or personal injury. Let the grinder finish its cycle, stop it completely, then make your adjustment and run a fresh batch to clear any retained grounds before pulling your next shot.